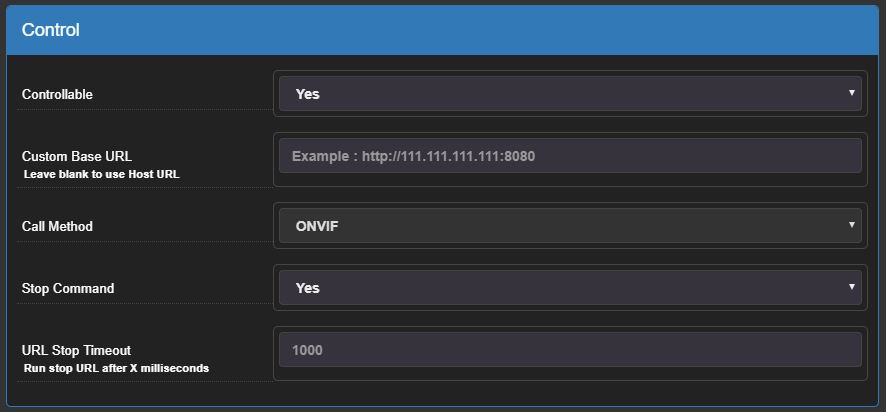
How to setup PTZ in Shinobi
In Monitor Settings window you have the "Control" section.
How to reveal the "Control" section
1. Open the Monitor Settings for the monitor you want to use PTZ with.
2. Set the view to "Advanced" in the bottom right corner.
3. Now you should see "Control" on the left menu.
How to setup PTZ with ONVIF
1. In the "Control" section set Call Method to ONVIF.
2. Hit save.
3. Now you should see a Cross button on your monitor's stream window.
Not working? Try each of the following.
- Click the triangle in the top right to see the log stream.
- Enable Stop Command. Some cameras require a secondary command to stop the requested action, like Reolink.
-
Make sure of what Port ONVIF is running on. Some cameras run it on port 8000, like Reolink, and others do it on port 80.
- If the port is different then set it in the Custom Base URL.
- Example : http://[CAMERA_IP]:[ONVIF_PORT]

How to setup PTZ with GET, PUT, and POST
1. Set the Call Method to GET, PUT, or POST. All of these choices will require the same setup.
2. Fill the Paths required to make the labelled motion.
3. Once filled, Hit Save.
4. Now you should see a Cross button on your monitor's stream window.
You can see a video of this done with an old Foscam on the first version of the Shinobi dashboard.
Using the API after you have it working
There are details about using the control method through the API here. The gist of what you need to know is pasted below.
This is the URL structure required to execute a "Control" action.
http://xxx.xxx.xxx.xxx/[API KEY]/control/[GROUP KEY]/[MONITOR ID]/[ACTION]
The possible choices for [ACTION] are as follows :
| Action Name | URL Parameter |
|---|---|
| Center | center |
| Up | up |
| Down | down |
| Left | left |
| Right | right |
| Enable Night-Vision | enable_nv |
| Disable Night-Vision | disable_nv |
| Zoom-In | zoom_in |
| Zoom-Out | zoom_out |
| Up (Stop) | up_stop |
| Down (Stop) | down_stop |
| Left (Stop) | left_stop |
| Right (Stop) | right_stop |
| Zoom-In (Stop) | zoom_in_stop |
| Zoom-Out (Stop) | zoom_out_stop |